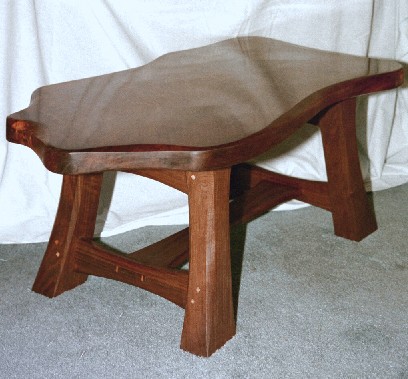
Crotch Walnut Coffee Table
I have a special place in my heart for walnut, particularly figured walnut. When I was a kid, my father made gunstocks out of walnut and I spent many hours "helping" him. Mainly I watched over his shoulder as he shaped the wood and I think this is where I first learned to eyeball a sculpted piece of wood for the right proportions and design. To this day the smell of walnut invokes a lot of memories for me and I'm quite willing to ignore the way it makes me sneeze.
My father made gunstocks out of figured American black walnut, California Claro walnut, and European walnut. These are all different. Today, it's hard to find reliable sources of nice walnut without breaking the bank. I've read that acres and acres of walnut trees were cut to supply gunstocks for the armies of World Wars I and II. It's also a slowly growing tree, reaching maturity only after 75 years or so. Consequently, the quality of the wood available today can be pretty poor. I've gotten used to discarding as much as half of the wood in a board because of knots and other defects.
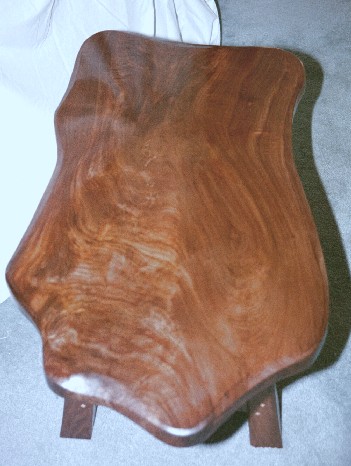
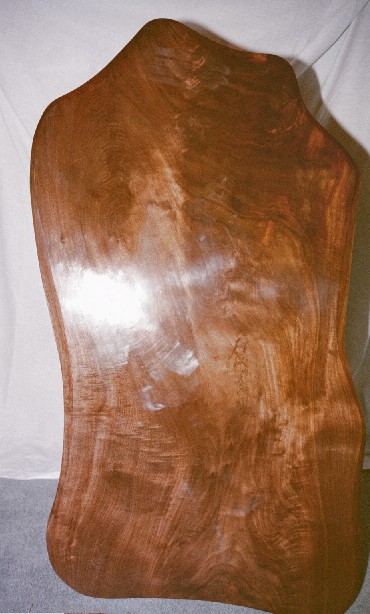
I keep my eye out for nice pieces of walnut and I've passed the word to severalĀ friends to let me know if they come across any. I really like the straight grained wood for table bases and I have a small supply of figured wood for tops and such. It was at a local hardwood supplier that I came across the slab (or flitch in woodworking jargon) of crotch walnut that went into the top of this table.
From the outset, I have to apologize for the photography. I have a hard time arranging the lighting in my house to photograph larger pieces and the pictures here don't capture the real beauty in this wood. Anyway, I was shopping for some ordinary wood, when this slab of walnut jumped out at me and demanded I take it home.
I've had some poor luck with walnut like this. Much of it seems to be dried improperly and over time in my shop it warps and splits so as to become useless. This piece was kiln dried, but had been sitting in an unheated storeroom for some time. I brought it down into my basement and stored it in a cool spot. To keep it from warping, I "stickered" it under a stack of other wood and placed a bunch of cement blocks on top of it. I left it this way for over a year, while I went on to other projects. During this time I mulled over in my mind what to do with this piece of wood. I knew it was destined to be a table top of some sort.
Now some years before this, my good friend, Bill, who owns a portable saw mill, had shown up at my house one summer evening with a small load of walnut. These were short thick boards of green wood. He thought they'd be good for boxes. I stacked and stickered this in my basement and let it dry for two or three years. Every once in a while I'd visit the stack and see how it was doing. After looking it over I saw the makings of some nice thick table legs in the stack and decided on a coffee table with the crotch walnut slab for a top.
I brought the wood into the dehumidified area of my shop and let it dry some more. The slab had survived pretty well. It remained reasonably flat and had only some minimal checks and cracks. This seems to be common for highly figured wood like this - the twists and turns in the grain that give it the figure lead to stresses in the wood that cause splitting as it dries.
The first part of the project was to shape the top. I roughly followed the original contours of the slab removing areas of bark and splintered wood. This left an asymmetrically shaped piece. I then began filling the cracks, checks and other minor defects with a dark colored epoxy. I wasn't trying to hide them - the objective was to strengthen and stabilize the wood. Up close you can still see the filled areas, but they don't scream out at you.
I then flattened and smoothed the slab with handplanes, scrapers, and electric sanding. The edges were softened and contoured with a drawknife, spokeshaves and scrapers. I went back several times to fill in and smooth any remaining defects. Once the top was in reasonable shape, I turned to making the base.
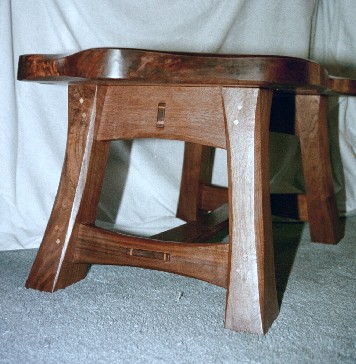
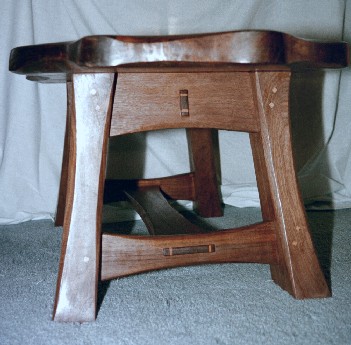
Because the top was thick and heavy (a real 2 inches thick), I wanted a base that looked substantial, without looking rough and unfinished. I've seen too many examples of "natural" styled furniture that (to my eye anyway) looks crude and thrown together. I gave myself an additional challenge and made the base with angled mortise and tenon joints. This made it less blocky looking and complement the curves on the legs and stretchers, but it's surprisingly more complicated to execute.
The mortises into the legs are secured with maple pegs and the through tenons on the stretchers are wedged in place. They also protrude from the mortise a 16th of an inch or so and are chamfered.
 ĀĀĀ
ĀĀĀ
I've come to love the look of orange shellac on walnut. It brings out a warm chocolate brown color that I find very appealing. The top is French polished and I went overboard on getting a perfect finish this time. Walnut is a fairly porous wood and I spent many evenings rubbing and polishing to fill the pores. After that I spent hours getting rid of any spots or imperfections until the top looked like glass. All the while I realized that this was kind of nuts, because as a piece of furniture the top will get scratched or marked up eventually. Oh well.....
Ā
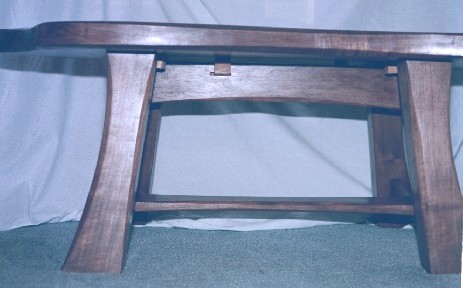
The top is secured to the base with wooden "buttons" that ride in slots in the base. This allows for seasonal movement of the top relative to the base.The dimensions of the table are roughly 36" long by 23" wide and 16" high.